Construction Method
The pattern and components are all manufactured from red board high density plastic. The plastic will be cut to pattern at H.F. Hauff using a CNC program made from Neil Hauff’s lead machine operator Jesús. All final designs are located in Appendix B. The pattern bed will be made from plywood with a laminate layer on the top and bottom. Because both materials will be cured, moisture in the green sand will not be an issue for potential damage or dimension changes within the pattern.
Pattern devise assembly will simply consist of the application of the pattern and design components to the pattern bed using an epoxy. This allows a perfectly parallel application. Using an epoxy puts a thin cured resin between the pattern bed and designed components that will only add approximately 0.002 inches to the total height of the adapter hub. Wood glue is optional but doesn’t provide the same strength as an epoxy.
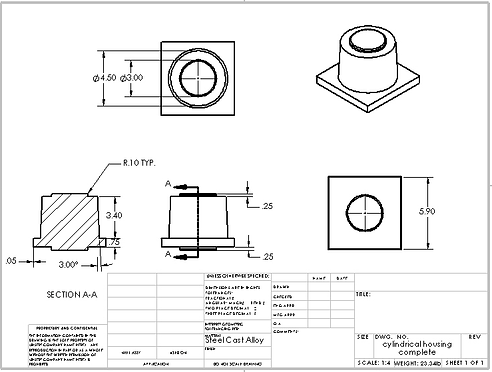
For this project, a core box will need to be made in order to make a sand core to fill the center of the hub. Placing this sand core into the pattern greatly reduces the post machining process and use of material. The core box will be constructed using the 3D printer available on the Central Washington University campus. The sand core made from the core box fill the cavity in the center of the pattern. So, the core box will be designed based around the size of the cylindrical housing. The core will be made using a no-bake sand process using the designed core box.
Each sand core for the adapter hub core will be made using a sodium silicate as a binder and silica sand from the CWU foundry. The sodium silicate activates when in contact with CO2. The binder then begins to solidify within 5 minutes. Thus, each core must be made in small batches because only one core box will be made for this project. Although a tedious task, prototyping takes time and costs money. The idea is the minimize costs and save time.
The pattern for the adapter hub will now be manufactured of out red board high density plastic instead of mahogany wood. The material has been donated from the CWU machining lab. The components such as the gating system will still be made from wood. Wood can easily be manipulated as well as allows for easy material addition and subtraction. For example, if the metal freezes at the gate and doesn’t fill the pattern cavity, then the gate needs to be larger. Wood can then be sanded to fit then glued on. This is an easy process and can be done within a day.
Discussion of Assembly
The assembly for the pattern devise is quite simple yet requires some serious precision that could make or break the devise. The pattern devise is broken up into a variety of parts that all come together onto the pattern bed. The components of the devise include two risers, two runners, two gates, and the pattern of the adapter hub. All components designed using SolidCast to ensure all material fills the pattern during the solidification process. If not properly dimensioned, the adapter hub will have air pockets, jagged edges, and could potentially seize during the pour. This is why all major components are designed around the adapter hub. It doesn’t matter if the risers don’t fill all the way or one of the gates froze, as long as the adapter hub is full and can be removed from the flask, the pattern devise will be successful.
The components will all be machined in house at H.F. Hauff co. in house using red board. This was a very easy decision because using the resources available; H.F. Hauff has a master machinist available. This ensures that each program to cut each component will be done properly and in a timely manner. The pattern bed is a simple piece of hardwood/laminated wood. The dimensions based off of the size of flask being used. Because the adapter hub is a fairly small part, it can be done in a 12X12 inch flask but, it will be designed for at 12X14; using a larger than necessary flask size gives more room for play with the components. Reducing costs is critical but having more room for the runners will make for a smooth pour once completed.
Assembly will be done using an epoxy and some set screws. Because dimensions are critical, using an epoxy for the component assembly on the pattern bed instead of screws, nuts and bolts will reduce material space. Adding anything to the pattern has to be machined off. The objective is to reduce machining so epoxy is most suitable. The screws will be used for the flanges that will guide the flask posts. The flask is made of steel and the pattern devise is all wood so it can easily be damaged. Adding the flanges for the guide holes simply reinforces that area to ultimately increase the lifespan of the devise as well as make for easy removal from the cope and drag.
Assembly was completed through epoxy and wood glue. Epoxy was used to make the final connection between the components to the pattern bed. Wood glue was used to add fillets on all sharp corners between the pattern bed and components. This process is very simple and almost necessary. The larger the draft angles and the lesser sharper edges on the pattern devise reduces the suction effect when the devise is being used in the sand. This was proven effective due to a recent test on March 9th, 2016. The epoxy and wood glue cured so the devise was tested in the sand. After packing the cope and drag, the pattern devise came out of the sand quite easily and minimal damage was done to the pattern mould.